


Build APIs with GraphQL and .NET Core - Part 2 of 2
In my previous post we covered how to get started with GraphQL by creating an empty ASP.NET application, installing SQLite, GraphQL, and Entity Framework Core, and testing our application using Banana Cake Pop. In this post, we’ll expand on our project from the previous example.
Adding Mutations
In the previous post, we created a project that stored manufacturers and products. We also setup the project to query the data. However, up to this point, we cannot add or modify the data. Today we’ll change that by using mutations. A mutation consists of the input, the payload, and the mutation. In our project, we’ll first create the input. The input will use the new C# 9.0 record type and is used to identify the expected type of input that will be passed in. For this example, I’m including both input records in the same file, Input.cs, inside the Graph folder:
1
2
3
4
5
6
7
8
9
using System;
using hotchocolatedemo.Data;
using HotChocolate.Types.Relay;

namespace hotchocolatedemo.Graph
{
    public record AddManufacturerInput(string Name);
    public record AddProductInput(string Name, float Price, DateTime LastUpdated, int ManufacturerId);
}
You’ll notice that I’m passing over the ManufacturerId instead of the entire Manufacturer object. I’ll still pass the correct object into the Product within the mutation (see below).
Next, we’ll add the payload. The payload will allow us to specify what we expect to return back to the client from the server. Again, I’m including both payloads in the same file, Payload.cs, inside the Graph folder:
1
2
3
4
5
6
7
8
9
10
11
12
13
14
15
16
17
18
19
20
21
22
using hotchocolatedemo.Data;

namespace hotchocolatedemo.Graph
{
    public class AddManufacturerPayload
    {
        public Manufacturer Manufacturer { get; }
        public AddManufacturerPayload(Manufacturer manufacturer)
        {
            Manufacturer = manufacturer;
        }
    }

    public class AddProductPayload
    {
        public Product Product { get; }
        public AddProductPayload(Product product)
        {
            Product = product;
        }
    }
}
The final piece of the mutation that we need to add is the mutation itself. For the mutation, we’ll add the functions as asynchronous methods. Each method will have three parameters: the input record, the database context, and the cancellation token. For each method, we’ll pass the input parameters into a new instance of the object we are looking to populate, add those items to the database, and return the payload back as a response. The payload will return back the new ID generated by the database save. For the Product mutation, we need to obtain the Manufacturer that matches the ID.
1
2
3
4
5
6
7
8
9
10
11
12
13
14
15
16
17
18
19
20
21
22
23
24
25
26
27
using HotChocolate;
using hotchocolatedemo.Data;
using System.Threading;
using System.Threading.Tasks;

namespace hotchocolatedemo.Graph
{
    public class Mutation
    {
        public async Task<AddManufacturerPayload> AddManufacturerAsync(AddManufacturerInput input, [Service]ApplicationDbContext context, CancellationToken cancellationToken)
        {
            var manufacturer = new Manufacturer { Name = input.Name };
            context.Manufacturers.Add(manufacturer);
            await context.SaveChangesAsync();
            return new AddManufacturerPayload(manufacturer);
        }

        public async Task<AddProductPayload> AddProductAsync(AddProductInput input, [Service]ApplicationDbContext context, CancellationToken cancellationToken)
        {
            Manufacturer? manufacturer = await context.Manufacturers.FindAsync(input.ManufacturerId);
            var product = new Product { Name = input.Name, Price = input.Price, LastUpdated = input.LastUpdated, PrimaryManufacturer = manufacturer };
            context.Products.Add(product);
            await context.SaveChangesAsync();
            return new AddProductPayload(product);
        }
    }
}
Finally, we have to register the mutation type. We’ll do this by passing the class Mutation that we defined above to the AddMutationType() method such as below:
1
services.AddGraphQLServer().AddQueryType<Query>().AddMutationType<Mutation>();
Using Our Mutations
Now that we’ve added our mutations, we’ll take the next step by using them. Run your application by using the command dotnet run. Grab the URL and head into Banana Cake Pop (as we did in part 1). You should now see your mutations added.
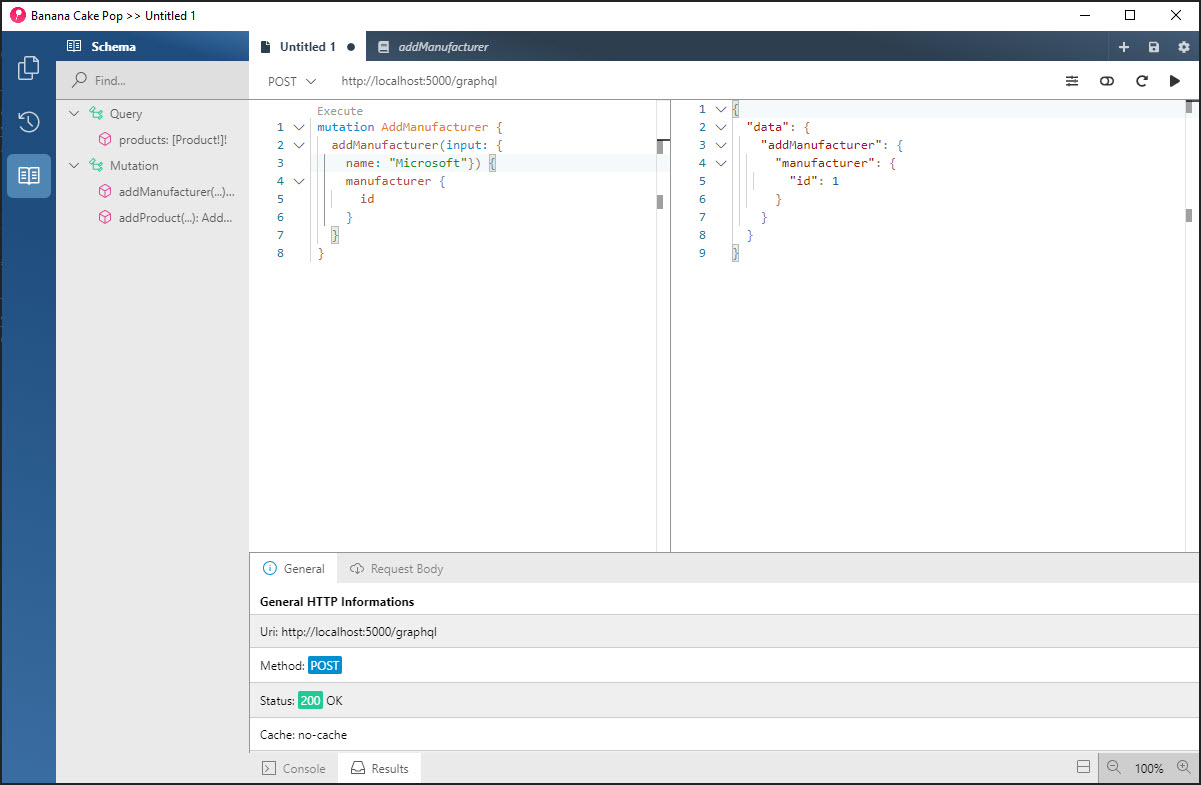
Next, we’ll add a few manufacturers. We’ll start off by adding Microsoft. Our request will look like this:
1
2
3
4
5
6
7
8
mutation AddManufacturer {
  addManufacturer(input: {
    name: "Microsoft"}) {
    manufacturer {
      id
    }
  }
}
Assuming we did everything correct, we should see a response where the ID is 1:
Repeat that process to add Sony as a manufacturer. You should see Sony come back as ID 2.
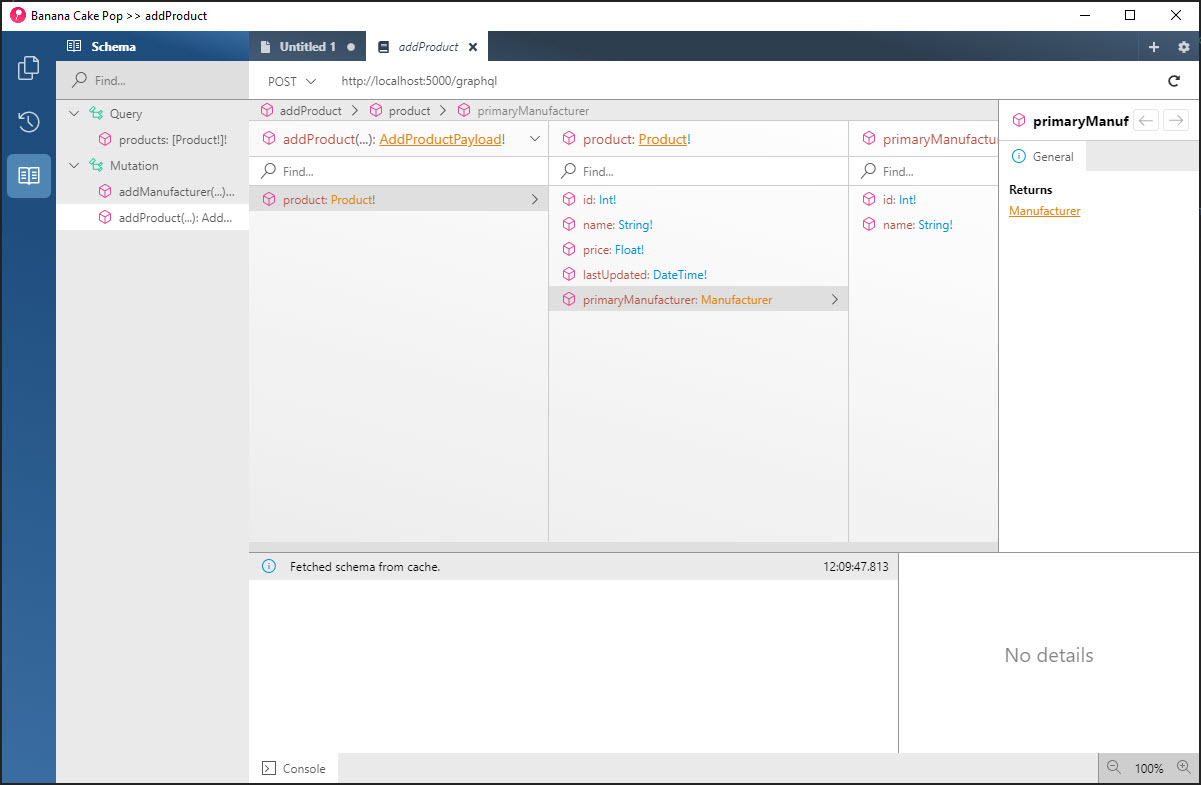
Next, we’ll add products. We’ll start by adding the new Xbox Series X device for Microsoft, which is likely our ID 1.
1
2
3
4
5
6
7
8
9
10
11
mutation AddProduct {
  addProduct(input: {
    name: "XBOX Series X",
    price: 499.99,
    lastUpdated: "11/04/2020",
    manufacturerId: 1}) {
    product {
      id
    }
  }
}
Again, like above, we should hopefully have success and see our ID return back.

Continue adding in Xbox Series S for Microsoft and then PS5 Console and PS5 Digital Edition for Sony.
Querying Our Data
Now that we’ve added our data, we’ll want to be able to query. The beauty of GraphQL is that we can choose which fields we’d like to query. So, if we’d like to just get the names of the products back, we can have a simple query like this:
1
2
3
4
5
{
  products {
    name
  }
}
You’ll notice that we don’t have to tell GraphQL we are going to query and provide a name. In the next example we will. In this example, we can query all of our data we’ve stored using this query:
1
2
3
4
5
6
7
8
9
10
11
12
query GetProducts {
  products {
    id
    name
    price
    lastUpdated
    primaryManufacturer {
      id
      name
    }
  }
}
If we performed everything correctly, we will hopefully return our data:
Next Steps
In this two part tutorial, you learned how to use Hot Chocolate to stand up a GraphQL server and to return data back to Banana Cake Pop. You learned how to add data to your data source using mutations in GraphQL. I’ll be posting more about GraphQL and consuming GraphQL data in the coming weeks. If you’d like to browse this project, be sure to visit the following: